基于Python去水印

一、整体流程概览

  1. 用YOLOv8自动检测图片里的水印区域,得到水印的“掩码图”mask(即黑白图,白色是水印)

  2. 用 lama-cleaner 命令行(支持自定义mask)对原图+掩码批量自动修复,得到无水印图

  3. 全程批量自动,不用人工一张张画框

  4. 路径是:/src/weibo/rmwatermarks:

    mask.py、lama-cleaner.py、venv、models

二、详细分步教程

Step 1. 环境准备

使用Python 3.10创建一个venv环境(推荐,避免torch等AI包兼容性问题)

1
python3.10 -m venv venv
1
source venv/bin/activate

Step 2. 安装去水印工具以及依赖

[!IMPORTANT]

安装ultralytics, 是一个专注于人工智能视觉检测,尤其是目标检测(Object Detection)领域的开源项目和公司。它最著名的产品是 YOLO(You Only Look Once)系列模型的官方实现

huggingface_hub,是huggingface/diffusers/transformers 系列模型托管和下载的基础包,很多 AI 项目都会自动带上

lama-cleaner,由 SOTA AI 模型提供支持的免费开源修复工具

编辑requirements.txt文件

1
2
3
4
5
6
7
8
9
torch==2.0.0                # PyTorch,深度学习核心库,模型推理和训练用
torchvision==0.15.1 # PyTorch 图像工具库,常用于数据处理和模型
diffusers==0.16.1 # Huggingface Diffusers,主要用于扩散模型(如Lama等图像修复/生成)
huggingface_hub==0.15.1 # Huggingface Hub客户端,下载模型/权重/上传数据
lama-cleaner==1.2.5 # lama-cleaner 图像去水印/修复工具(可用mask批量修复)
ultralytics # YOLOv8官方库,目标检测模型推理用
PySocks # socks5代理支持(如某些pip需代理)
PyQt5 # Qt5 GUI库,labelImg等图形界面依赖
lxml # 读写XML文件,labelImg等依赖VOC格式时必备
1
pip3.10 install -r requirements.txt

Step 3. 下载/准备YOLOv8水印检测模型

[!IMPORTANT]

可以直接用开源训练好的通用水印检测模型,比如这个yolov5-watermark(适配微博/公众号/小红书等)

将后缀为pt的模型放在以下文件夹中,这是我的模型:best.pt

下载地址:https://pan.baidu.com/s/1xRzBTlBlDk0vM980rgB79g 提取码: hui9

放在:src/weibo/rmwatermarks/models/

lama-cleaner 是基于“大LAMA模型(big-lama)”的 inpainting 修复工具,这个也是必须,省的lama-cleaner报错

下载地址:https://pan.baidu.com/s/10Q6cls-XbgH-ggF9LCetWQ 提取码: hui9

放在:~/.cache/torch/hub/checkpoints/big-lama.pt

big-lama.pt 就是 Lama 模型的核心“权重文件”(model checkpoint),是神经网络的所有参数,本地没这个文件,模型根本没法运行

工作流程:

首次启动 lama-cleaner(无 big-lama.pt),程序会自动联网下载官方权重包到你的缓存目录(默认 PyTorch 习惯是 ~/.cache/torch/hub/checkpoints/)。

下好后永久复用。你之后每次启动 lama-cleaner、调用 inpaint,都会直接加载这个 big-lama.pt

如果你删除 big-lama.pt,lama-cleaner 会再次自动下载(只要本地没找到权重文件)

Step 4. 批量检测所有图片,导出mask

新建检测脚本(这是我的路径你们可以选择自己的)

1
src/weibo/rmwatermarks/mask.py
1
2
3
4
5
6
7
8
9
10
11
12
13
14
15
16
17
18
19
20
21
22
23
24
25
26
27
28
29
30
31
32
33
34
35
36
37
from ultralytics import YOLO
import cv2
import os
import numpy as np
from PIL import Image

model = YOLO('/src/weibo/rmwatermarks/models/best.pt')

img_dir = '/src/weibo/rmwatermarks/image' # 去水印的图片路径
mask_dir = '/src/weibo/rmwatermarks/mask/' # 生成的mask文件路径,后面需要
os.makedirs(mask_dir, exist_ok=True)

for fname in os.listdir(img_dir):
if not fname.lower().endswith(('.jpg', '.png', '.jpeg')):
continue
img_path = os.path.join(img_dir, fname)
im = Image.open(img_path)
w, h = im.size
mask = np.zeros((h, w), dtype=np.uint8)

results = model(img_path)
boxes = results[0].boxes.xyxy.cpu().numpy() # [x1, y1, x2, y2]
# 自动截断,避免溢出边界
for box in boxes:
x1, y1, x2, y2 = map(int, box)
x1 = max(x1, 0)
y1 = max(y1, 0)
x2 = min(x2, w)
y2 = min(y2, h)
mask[y1:y2, x1:x2] = 255

mask_img = Image.fromarray(mask)
# 统一保存为 png 格式
mask_name = fname.rsplit('.',1)[0] + '_mask.png'
mask_img.save(os.path.join(mask_dir, mask_name), format="PNG")
print(f"生成mask:{mask_name}")

运行:python3.10 mask.py

验证mask图和去水印图片是否一致(可跳过)

1
python3.10 check_and_fix_mask.py
1
2
3
4
5
6
7
8
9
10
11
12
13
14
15
16
17
18
19
20
21
22
23
24
25
26
27
28
29
30
31
32
33
34
35
36
37
38
39
40
41
42
43
44
45
46
47
48
49
50
51
52
53
54
import os
from PIL import Image
import numpy as np

# 配置目录pip install pillow numpy
img_dir = '/src/weibo/rmwatermarks/image'
mask_dir = '/src/weibo/rmwatermarks/mask'

def fix_mask(img_path, mask_path):
try:
img = Image.open(img_path)
mask = Image.open(mask_path)

# 1. 检查并自动修正尺寸
if mask.size != img.size:
print(f"[尺寸不一致] {os.path.basename(mask_path)}: {mask.size} -> {img.size}")
mask = mask.resize(img.size, Image.NEAREST)

# 2. 强制灰度L模式
if mask.mode != "L":
print(f"[模式不一致] {os.path.basename(mask_path)}: {mask.mode} -> L")
mask = mask.convert("L")

# 3. 二值化(只含0/255)
mask_bin = mask.point(lambda x: 255 if x > 127 else 0, mode='1').convert("L")
uniq = np.unique(np.array(mask_bin))
if not (np.array_equal(uniq, [0]) or np.array_equal(uniq, [255]) or np.array_equal(uniq, [0, 255])):
print(f"[二值化修正] {os.path.basename(mask_path)} 唯一值: {uniq} -> [0,255]")
mask = mask_bin

# 4. 保存修正后的mask
mask.save(mask_path)

print(f"[OK] {os.path.basename(img_path)} <-> {os.path.basename(mask_path)} size: {img.size} mode: {mask.mode} 唯一值: {np.unique(np.array(mask))}")

except Exception as e:
print(f"[ERROR] {os.path.basename(mask_path)}: {e}")

def main():
for fname in os.listdir(img_dir):
if not fname.lower().endswith(('.jpg', '.jpeg', '.png')):
continue
img_base = fname.rsplit('.', 1)[0]
mask_name = img_base + '_mask.png'
img_path = os.path.join(img_dir, fname)
mask_path = os.path.join(mask_dir, mask_name)
if os.path.exists(mask_path):
fix_mask(img_path, mask_path)
else:
print(f"[缺少mask] {mask_path}")

if __name__ == '__main__':
main()

Step 5. 用 lama-cleaner 批量修复去水印(自动读取mask)

编写批处理脚本

1
src/weibo/rmwatermarks/lama-cleaner.py

[!IMPORTANT]

每张图片都会用同名mask修复水印区域,输出到 image_nowm/

1
2
3
4
5
6
7
8
9
10
11
12
13
14
15
16
17
18
19
20
21
22
23
24
25
26
27
28
29
30
31
32
33
34
35
36
37
38
39
40
41
42
43
44
45
46
47
48
49
50
51
52
53
54
55
56
57
58
59
60
61
62
63
64
65
66
67
68
69
70
71
72
73
74
75
76
77
78
79
80
81
82
83
84
85
86
87
88
89
90
91
92
93
94
95
96
97
98
99
100
101
102
103
104
105
106
107
108
109
110
111
112
113
114
115
116
117
118
119
120
121
122
123
124
125
126
127
128
129
import requests
import os
import numpy as np
from PIL import Image
from io import BytesIO

# 1. 配置路径
img_dir = '/home/zjh/src/weibo/rmwatermarks/image' # 原始图片目录
mask_dir = '/home/zjh/src/weibo/rmwatermarks/mask' # mask目录
out_dir = '/home/zjh/src/weibo/rmwatermarks/image_nowm/' # 输出目录
os.makedirs(out_dir, exist_ok=True) # 创建输出目录(如果不存在)

MAX_SIZE = 4096 # 图片最大边长,过大就自动缩放

# 2. 遍历图片文件夹
for fname in os.listdir(img_dir):
# 只处理图片文件
if not fname.lower().endswith(('.jpg', '.jpeg', '.png')):
continue

img_base = fname.rsplit('.', 1)[0]
mask_name = img_base + '_mask.png'
mask_path = os.path.join(mask_dir, mask_name)
in_path = os.path.join(img_dir, fname)
out_path = os.path.join(out_dir, fname)

# mask 必须存在
if not os.path.exists(mask_path):
print(f"未找到mask:{mask_path}")
continue

# 3. 打开图片和mask,确保尺寸匹配
try:
img = Image.open(in_path)
mask = Image.open(mask_path)

# 缩放图片和mask到最大边长 MAX_SIZE,且保证两者同尺寸
scale = min(MAX_SIZE / img.size[0], MAX_SIZE / img.size[1], 1.0)
new_size = (int(img.size[0] * scale), int(img.size[1] * scale))
if img.size != new_size:
print(f"{fname} 图片过大({img.size}), 自动resize -> {new_size}")
img = img.resize(new_size, Image.LANCZOS)
if mask.size != new_size:
print(f"{fname} mask尺寸不一致,自动resize: {mask.size} -> {new_size}")
mask = mask.resize(new_size, Image.NEAREST)

# mask 灰度化、二值化,保证只有0/255
if mask.mode != "L":
mask = mask.convert("L")
mask = mask.point(lambda x: 255 if x > 127 else 0, mode='1').convert("L")
mask_array = np.array(mask)
if mask_array.max() == 0:
print(f"{fname} mask全黑,跳过(没有检测到水印区域)")
continue
except Exception as e:
print(f"图片或mask无法打开:{fname}, {e}")
continue

# 4. 构造 BytesIO,防止IO冲突
img_bytes = BytesIO()
img.save(img_bytes, format='PNG')
img_bytes.seek(0)
mask_bytes = BytesIO()
mask.save(mask_bytes, format='PNG')
mask_bytes.seek(0)

# 5. 构造 POST 数据
files = {
'image': ('image.png', img_bytes, 'image/png'),
'mask': ('mask.png', mask_bytes, 'image/png')
}

# ======= 你所有的 lama-cleaner 参数都写这里 =======
# 如果要不同图片用不同参数,这里也可以灵活调整
data = {
"ldmSteps": 8,
"ldmSampler": "plms",
"hdStrategy": "Original",
"zitsWireframe": "false",
"hdStrategyCropMargin": 128,
"hdStrategyCropTrigerSize": 2000,
"hdStrategyResizeLimit": 2000,
"prompt": "",
"negativePrompt": "",
"useCroper": "false",
"croperX": 0,
"croperY": 0,
"croperHeight": 0,
"croperWidth": 0,
"sdScale": 1.0,
"sdMaskBlur": 3,
"sdStrength": 0.75,
"sdSteps": 50,
"sdGuidanceScale": 7.5,
"sdSampler": "plms",
"sdSeed": -1,
"sdMatchHistograms": "false",
"cv2Flag": "INPAINT_NS",
"cv2Radius": 3,
"paintByExampleSteps": 50,
"paintByExampleGuidanceScale": 7.5,
"paintByExampleMaskBlur": 3,
"paintByExampleSeed": -1,
"paintByExampleMatchHistograms": "false",
"paintByExampleExampleImage": "",
"p2pSteps": 50,
"p2pImageGuidanceScale": 1.5,
"p2pGuidanceScale": 7.5,
"controlnet_conditioning_scale": 1.0,
"controlnet_method": "none",
}

# 6. 发送 POST 请求,获得结果
try:
response = requests.post(
'http://127.0.0.1:8188/inpaint',
files=files,
data=data,
timeout=120 # lama-cleaner 慢可适当调大
)
if response.status_code == 200:
with open(out_path, 'wb') as f_out:
f_out.write(response.content)
print(f"处理完成: {fname}")
else:
print(f"处理失败: {fname}, 状态码: {response.status_code}, 响应: {response.text[:100]}")
except Exception as e:
print(f"处理异常: {fname}, 错误: {e}")

[!IMPORTANT]

首先运行

1
lama-cleaner --model lama --host 127.0.0.1 --port 8188 --debug

提示如下信息就代表成功

1
2
Running on http://127.0.0.1:8188
Press CTRL+C to quit

然后运行:python3.10 lama-cleaner.py

所有去掉水印的图片都保存在:/src/weibo/rmwatermarks/image_nowm/


以上是已有模型进行的去水印,下面是训练自己的去水印模型⬇️

请注意自己的路径,以下是全新的路径,唯独共用一个venv

三、训练去水印模型

Step 1.前提训练模型前,需要大量手动给有水印的图片加矩形选区,这里我推荐以下两款工具

[!IMPORTANT]

labelImg本地

https://roboflow.com/在线

这里我选择labelImg本地进行绘制,目前文件路径为:

src/weibo/rmwatermarks:
src/weibo/rmwatermarks/trainingmodel:
  • dataset 自行创建(必须)

  • train_val.py 自行创建(代码如下)这是为了划分train和val图片,先不要运行!!!

    1
    2
    3
    4
    5
    6
    7
    8
    9
    10
    11
    12
    13
    14
    15
    16
    17
    18
    19
    20
    21
    22
    23
    24
    25
    26
    27
    28
    29
    30
    31
    32
    33
    34
    35
    36
    37
    38
    39
    40
    41
    42
    import os
    import random
    import shutil

    # 1. 原始数据目录,图片和txt一一对应、都在里面
    src_dir = '/home/zjh/src/weibo/rmwatermarks/trainingmodel/dataset/datasource' # 修改为你的原始数据目录
    dst_dir = '/home/zjh/src/weibo/rmwatermarks/trainingmodel/dataset'

    # 2. 输出目录结构
    images_train = os.path.join(dst_dir, 'images', 'train')
    images_val = os.path.join(dst_dir, 'images', 'val')
    labels_train = os.path.join(dst_dir, 'labels', 'train')
    labels_val = os.path.join(dst_dir, 'labels', 'val')
    for d in [images_train, images_val, labels_train, labels_val]:
    os.makedirs(d, exist_ok=True)

    # 3. 获取所有图片(支持jpg、jpeg、png)
    img_exts = ('.jpg', '.jpeg', '.png')
    imgs = [f for f in os.listdir(src_dir) if f.lower().endswith(img_exts)]

    random.shuffle(imgs) # 打乱顺序
    val_ratio = 0.2 # 验证集比例
    num_val = int(len(imgs) * val_ratio)
    val_imgs = imgs[:num_val]
    train_imgs = imgs[num_val:]

    def copy_pair(imgs, img_dst, label_dst):
    for img in imgs:
    base = os.path.splitext(img)[0]
    img_path = os.path.join(src_dir, img)
    label_path = os.path.join(src_dir, base + '.txt')
    if not os.path.exists(label_path):
    print(f'标签文件缺失: {label_path},跳过。')
    continue
    shutil.copy(img_path, os.path.join(img_dst, img))
    shutil.copy(label_path, os.path.join(label_dst, base + '.txt'))

    copy_pair(train_imgs, images_train, labels_train)
    copy_pair(val_imgs, images_val, labels_val)

    print(f"划分完成,train: {len(train_imgs)},val: {len(val_imgs)}")

  • watermark.yaml 自行创建(代码如下)

    1
    2
    3
    4
    5
    6
    path: src/weibo/rmwatermarks/trainingmodel/dataset/
    train: images/train
    val: images/val

    names:
    0: watermark
src/weibo/rmwatermarks/trainingmodel/dataset:
  • datasource 自行创建(必须)在这里面放入要画矩形的水印图片
  • images 自动生成
  • labels 自动生成
  • classes.txt 自动生成

Step 2.运行labelImg工具(可选venv环境)

安装所需依赖

[!TIP]

根据自己的系统来安装(如果不用venv环境,就在系统中安装以下命令)(venv默认已经安装PyQt5的)

1
2
sudo apt-get install pyqt5-dev-tools
sudo pacman -S python-pyqt5

[!IMPORTANT]

上面我已经放了labelImg的下载地址,解压出来cd labelImg,运行以下命令

1
2
pip3.10 install -r requirements/requirements-linux-python3.txt
python3.10 labelImg.py

打开目录:src/weibo/rmwatermarks/trainingmodel/dataset/images/这里我们前面已经交代了,通过如下图片进行选区保存等
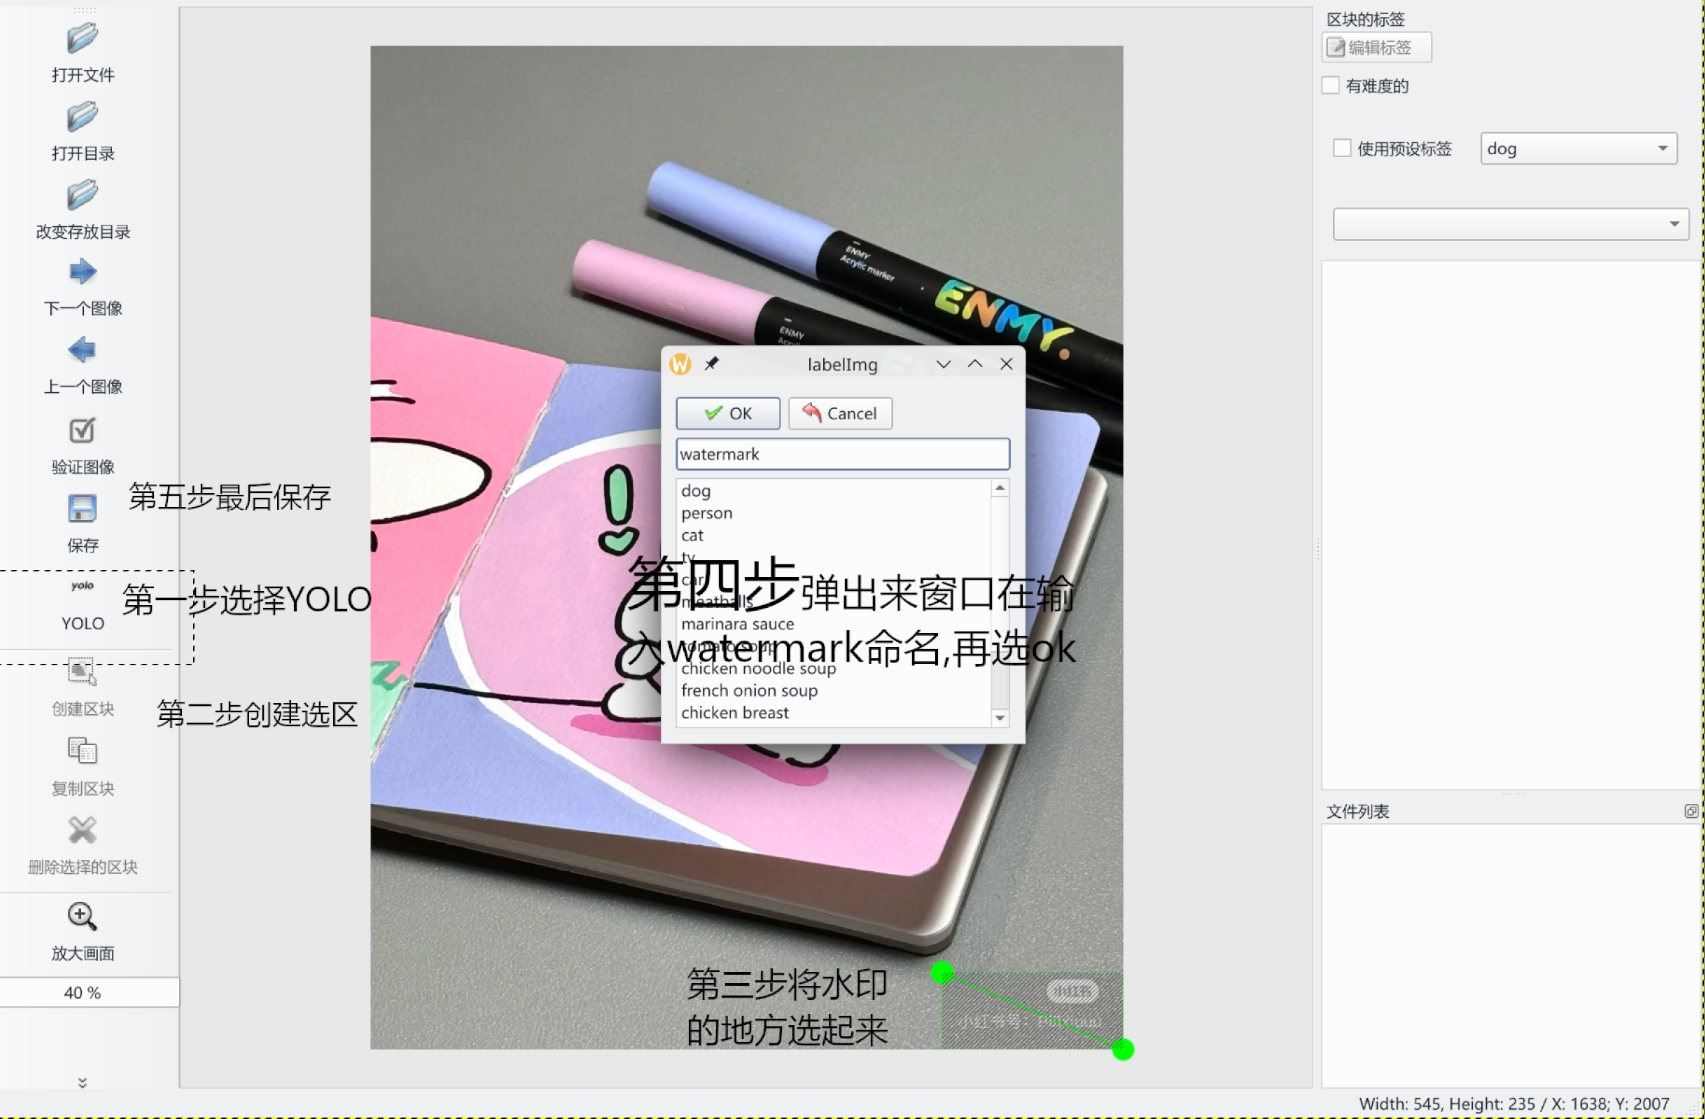
image-20250722151213314

[!IMPORTANT]

选区完成之后可以看到我们datasource下有很多图片以及txt文件

运行train_val.py将txt和图片分类开

1
python3.10 train_val.py

以下两种文件就生成了

  • labels 里面装着txt文件
  • images 里面就是画好选区的图片
  • datasource 这个数据源就可以删除了,也可以不删除

Step 3.正式编写模型(需要venv环境)

1
source venv/bin/activate

[!IMPORTANT]

data=trainingmodel/watermark.yaml根据自己的路径改

**这里需要一个yolov8n.pt官方的模型,下载链接:https://pan.baidu.com/s/1fyq6qhjnkglEj4cflSDvjg 提取码: hui9 **

把他放在和venv同目录下,也就是我们目前的src/weibo/rmwatermarks/目录下

运行以下命令:

1
yolo detect train data=trainingmodel/watermark.yaml model=yolov8n.pt epochs=100 imgsz=640 batch=8

出现以下等等信息代表成功,模型放在src/weibo/rmwatermarks/runs/detect/train/weights/best.pt

1
2
3
4
5
6
7
8
9
10
11
12
13
14
15
16
17
18
19

Epoch GPU_mem box_loss cls_loss dfl_loss Instances Size
100/100 1.19G 0.5884 0.7077 0.8859 6 640: 100%|██████████| 10/10 [00:00<00:00, 12.34it/s]
Class Images Instances Box(P R mAP50 mAP50-95): 100%|██████████| 2/2 [00:00<00:00, 26.77it
all 19 19 0.995 1 0.995 0.597

100 epochs completed in 0.028 hours.
Optimizer stripped from runs/detect/train/weights/last.pt, 6.2MB
Optimizer stripped from runs/detect/train/weights/best.pt, 6.2MB

Validating runs/detect/train/weights/best.pt...
Ultralytics 8.3.169 🚀 Python-3.10.0 torch-2.0.0+cu117 CUDA:0 (NVIDIA GeForce RTX 4070 Laptop GPU, 7781MiB)
Model summary (fused): 72 layers, 3,005,843 parameters, 0 gradients, 8.1 GFLOPs
Class Images Instances Box(P R mAP50 mAP50-95): 100%|██████████| 2/2 [00:00<00:00, 22.66it
all 19 19 0.991 1 0.995 0.634
Speed: 0.1ms preprocess, 2.8ms inference, 0.0ms loss, 0.4ms postprocess per image
Results saved to runs/detect/train
💡 Learn more at https://docs.ultralytics.com/modes/train


基于Python去水印
http://huishao.net/2025/08/28/去水印/
作者
huishao
发布于
2025年8月28日
许可协议